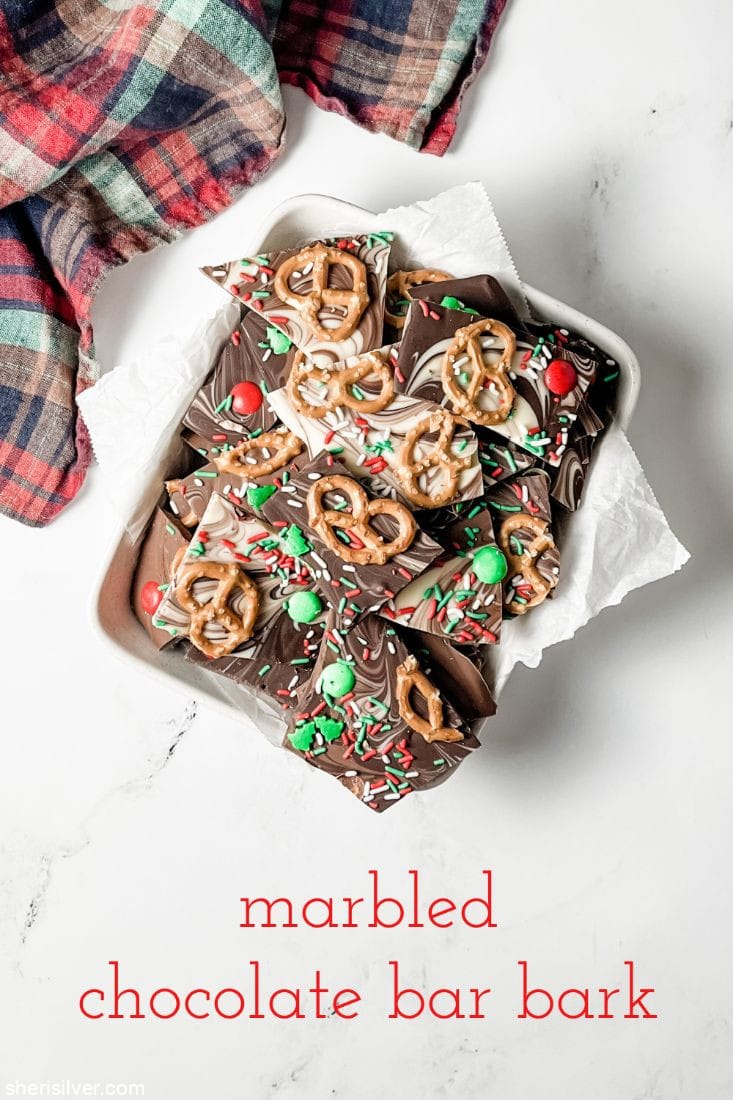
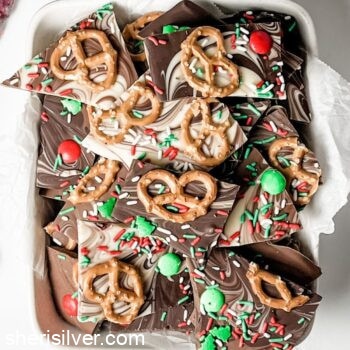
marbled chocolate bar bark is the perfect last minute gift!
Save this marbled chocolate bar bark for all those last minute treat and gift needs that seem to always pop up this month!
chocolate bark is one of the easiest foodie gifts you can make!
I love to make bark – it’s one of those recipes that requires zero skill, minimal time and effort and yet yields such satisfying results!
what is bark?
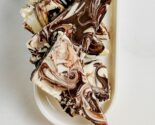
Bark is simply melted chocolate that’s poured into a sheet pan and broken into pieces once it’s set. You can use literally any kind of chocolate – chocolate chips, melting wafers, fancy “feves” – and it will always come out great (see: cobweb bark, red white and blue bark, and almond butter bark!).
this marbled chocolate bar bark takes the basic idea to the next level!
I saw this marble bark recipe on Instagram last year and had been patiently waiting for just the right occasion to make it. A last minute holiday party invite was the perfect opportunity!

The result is so pretty (and looked so delicious!) that I knew I had to try it!
how do you make it?
Chocolate bark is probably one of my favorite desserts because of how quick and easy it is to make. After weeks of endless rounds of baking – and measuring and folding and cleaning up – I love the effortlessness of bark. There’s minimal equipment needed, zero mess and no fussing!
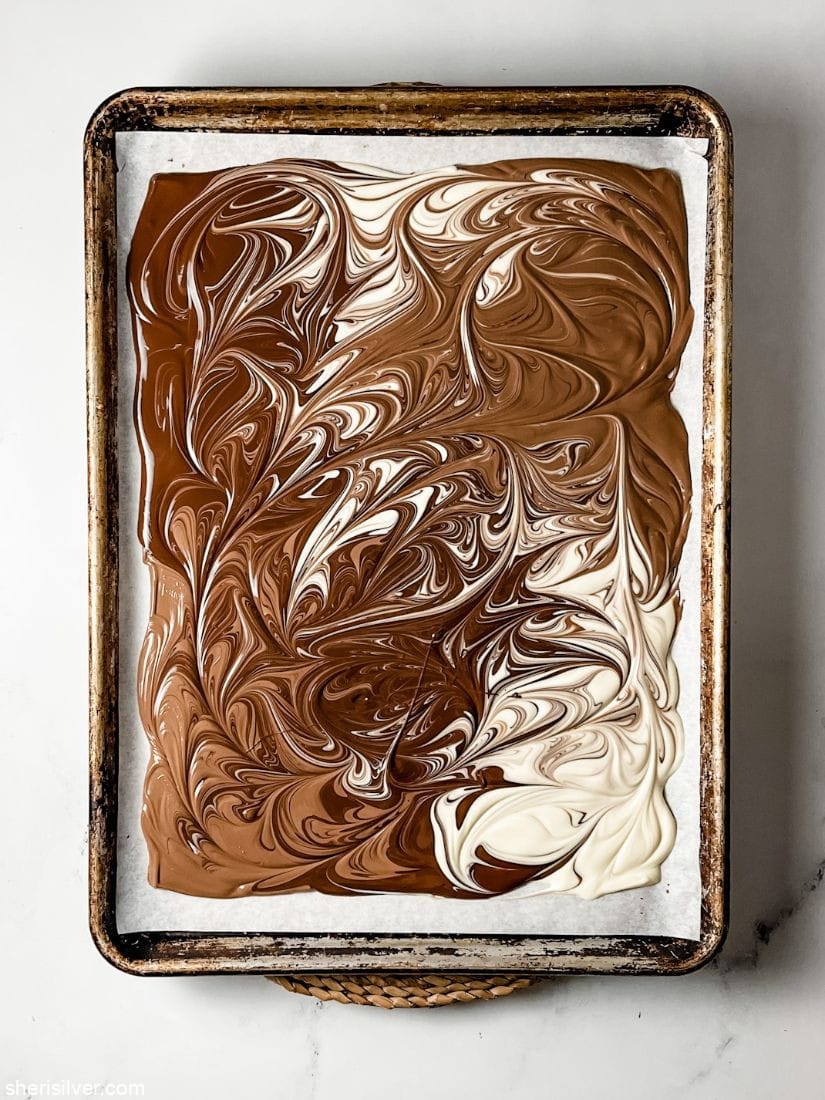
Though bark is typically made by melting the chocolate in a double boiler, this is even easier. Just lay your bars side by side on a parchment paper lined baking sheet and pop into a low oven. I set my oven to 175 degrees, and find that it takes between 5 and 7 minutes to get everything nice and “melty”. Once removed you’ll use a skewer to swirl the chocolate into a marbled pattern, and then add your choice of toppings to finish it off.
what ingredients do you need?
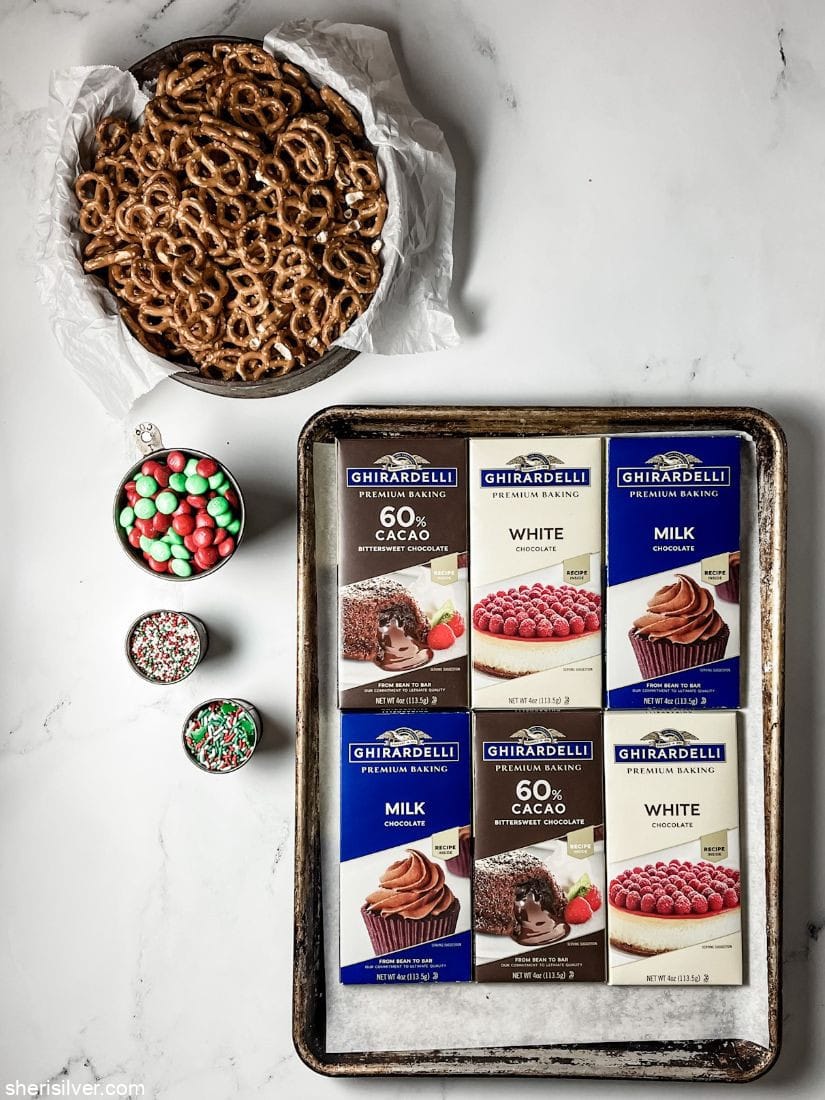
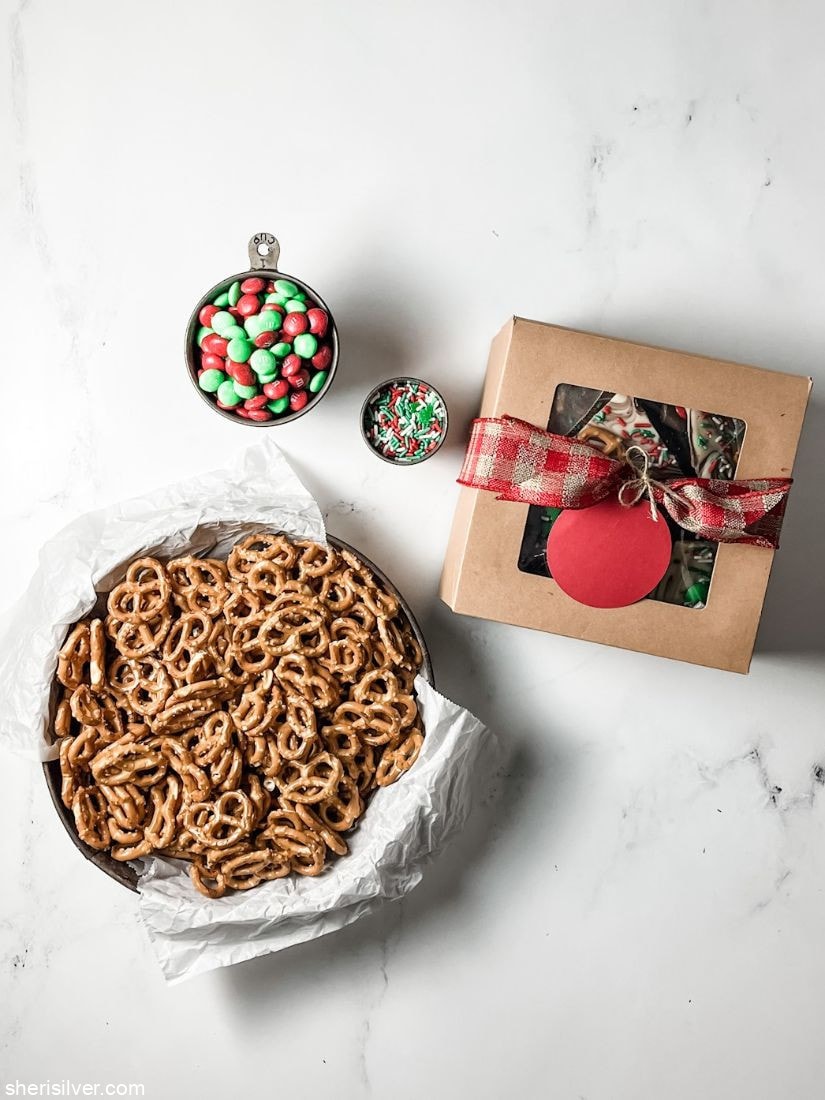
I used 6 full size chocolate bars – a mix of white, milk and bitter sweet chocolate. As this bark was going to a holiday party I kept “on theme” for Christmas by adding red and green M&M’s and sprinkles. And because I am forever #teamsweetandsalty I finished things off with some mini pretzels.
can you switch up the chocolate and toppings?
Heck yeah! The sky is the actual limit with this recipe, and can be endlessly adapted for the season, dietary restrictions and personal preferences. You can use dairy-free chocolate and toppings for a vegan bark. Chocolate is typically gluten free so if you need to go that route, just choose the appropriate toppings. And of course you can use more or less of whichever chocolate bars you like – semisweet chocolate would be a nice addition!
The ONE thing I would strongly suggest is using high quality chocolate. I have never tried this with lesser-quality brands but can’t guarantee that they will melt as evenly/consistently. That said, if you try it and it works please let me know!
And the toppings can include anything and everything – peppermint bark is a classic, but nuts, dried fruit, marshmallows, graham crackers, cereal, even your favorite cookie or candy will all work!
this is a great do-ahead treat!
It just gets better, too – because you can make this marbled chocolate bark in advance and keep it in an airtight container for up to a week at room temperature or in the fridge or freezer for easily a month, till you’re ready to gift or serve.
how do you package marbled chocolate bar bark for gifting?
Because of the sturdy nature of chocolate bark you can get creative with packaging. Cellophane bags, kraft boxes or any kind of pastry box is perfect. You can arrange it on a pretty tray for a gift that lasts after the bark is finished. And if you want to go “extra” you can keep the bark in the pan and tie a chocolate breaking hammer to the pan with a ribbon so the recipients can have at it!
Let me know if you try it!
Note: After hearing from several readers I’ve amended the recipe to include the following tip: at the 5 minute mark pull the tray, still on the rack, out of the oven. Use your knife or skewer to gently pull through the chocolate. If it moves easily it’s ready to come out. If not, pop it back in for another minute. You shouldn’t need more than 7 minutes for all of the chocolate to be sufficiently melty.
Marbled Chocolate Bar Bark
Equipment
Ingredients
- 2 4 ounce white chocolate bars
- 2 4 ounce milk chocolate bars
- 2 4 ounce bittersweet chocolate bars
- mini salted pretzel twists
- M&M's
- Christmas sprinkles
Instructions
- Pre-heat the oven to 175 degrees. Line a baking sheet with parchment paper.
- Arrange the chocolate bars on your baking sheet in two rows of three, placing them as closely together as possible.
- Bake for 5 minutes. Working carefully, slide the oven rack out and try to swirl the chocolate with a skewer or thin knife. If the chocolate feels fluid you can remove the tray. If not, return to the oven for another minute, and test again. You should need no more than 7 minutes total for all of the chocolate to be sufficiently melted. Use a skewer or thin knife to swirl the chocolate into a marbled design. Immediately top with the pretzels, M&M's and sprinkles. Freeze or refrigerate till set.
- Break the bark into pieces. Store in an airtight container at room temperature, in the fridge or in the freezer.
Please note that this post contains affiliate links. As a Rewards Style influencer I earn a small commission from qualifying purchases – at no additional cost to you.

48 Comments
Leave a Comment

Hi! I'm Sheri!
Welcome to my little corner of the web where you’ll find easy, delicious recipes, the best kitchen hacks and simple tips for turning your home into a clean haven that is free of toxins. So glad you’re here!

Hi Sheri, I also had difficulty with this recipe. I used cooking chocolates – the dark chocolate was the only one that melted after 5 minutes. The three varieties of chocolate seem to have different melting temperatures. I decided to melt the chocolate the old fashioned way over boiling water on the stove then pour melted chocolates onto the tray, this worked much better.
Hi! I just remade this recipe today and it worked perfectly! What brand(s) of chocolate did you use?
Hi. I just made some candy Christmas Bark. It’s in the fridge to cool,and set. It should be ready for after dinner tonight. I hope..
Ooh let me know how it turns out!
The same happened to me too! I was so upset! The dark chocolate melted no problem, but my milk chocolate and white chocolate wouldn’t melt. It came out looking like a cookie crumble. I used PC dark chocolate and Lindt milk & white chocolate. I learned Lindt chocolate doesn’t melt in the oven. I was so upset. I went out and bought more PC dark & milk chocolate and white chocolate chips and everything turned out great!
Hi Kari! I actually made the recipe this week and used a mix of Ghiradelli dark and white with Lindt milk. Here’s the link to the video: https://www.instagram.com/stories/sherisilver/3264157525690118732?utm_source=ig_story_item_share&igsh=bWUyYTBwZDJ4Zndo And it all melted beautifully! So sorry it didn’t work for you!!
Kari, what brand do you recommend for melting? Is Ghirardelli good?
I’ve used Ghiradelli and Lindt – both work beautifully!
I use Aldi dark milk and white and the taste is amazing never had an issue with any melting differently.
I’m so glad to hear that – and good to know about Aldi chocolate! Thank you for sharing!
Same here! I’ve made it a few times and it’s always turned out tasting great…although I’ve had a couple of issues with getting the marbling down right. I’m going to try it again tonight and see how it goes!
Good luck – let us know how it turns out!
Thanks! It actually went pretty well – the marbling turned out alright. 🙂
Yay! I’m so glad; it’s one of my favorite quick/easy recipes!
I had the same problem when I did Ghirardelli white and milk chocolate. The chocolates melted with different times. I definitely had to cook longer than the suggested time.
Sheri what kind of chocolate are you using
I’ve used Ghiradelli (shown in the pictures and video) as well as Lindt!
I used the Lindt bars and it came out beautifully . Heated at 180 for 6 min. Thank you for sharing
Thank you for sharing! 🙂
I have used this recipe now for over 2 years, not just for Christmas. So quick and easy, had no problems with bars melting, changed the topping , at Christmas used Christmas M&M’s and pecans, Easter pastel M& M’s and slivered almonds and coconut, other times mixed cashews, almonds, pecans and added chocolate chips. Endless options.
I’m so glad to hear that! I think it’s such a good one too and also make it all year round! 🙂
Hello Sheri. Have you ever tried this with chocolate chips? I’m thinking it should be the same, but who knows! Plus I would need to add some coconut oil wouldn’t I. Thank you Sheri
I have not – chocolate chips are designed to hold their shape while baking so are not the best for this type of recipe. THAT said, if I were to try it with chips I’d melt them all separately (using a little coconut oil as you suggested) and then pour in dollops on my baking sheet before swirling together. Let me know if you try it!
Thank you. Will let you know.
I agree regarding the chocolate chips. I bought Nestles brand premier White Chocolate and Dark Chocolate to do a test bark. The dark chocolate melted perfectly after ten minutes but the white stayed in its shape. On their package for the white melting directions it states to add a tablespoon of veg shortening to one cup of chips for melting. It does not say this on the dark chocolate package. I tried white chocolate melting wafers from Aldi and they were perfect.
Thank you for sharing all of this!
Super easy and versatile. Turned out pretty.
I couldn’t find any baking milk chocolate so I ended up using two regular milk chocolate bars from Lindt that were roughly the same size as the others (4.4oz).
Baked for 7 minutes at 175.
Yes, the dark chocolate took longer to soften (hence the extra 2 minutes for my oven) but in no way was any of the chocolate even close to burning. I don’t really get how that’s happening for some people.
Chilled for 2 hours in the fridge and packaged immediately.
Thank you so much for sharing! I’ve made this many times but actually did it again this week just to see if there was something I was missing! I’m so glad that you had success (and let me know about it ;))!
Hi Sheri, thanks for sharing you recipe.
Just a question about packaging. I live in a hot city. I find that they melt while I package them. Any tips to share?
Thanks,
Monica
Are you talking about packaging for shipping? Or storing? If you want to store I’d pop in the fridge or freezer. The downside is that condensation can form, which doesn’t affect the taste but could change the appearance, especially of any toppings you use. Let me know if you’re asking for shipping tips!
Just made these today for a surprise party. I used Aldi’s Dark and Milk chocolate bars. They melted in 9 minutes. Added their white chocolate bars to a few since we aren’t big on that flavor.
I’m so glad it worked out! I love this recipe so much around the holidays – so quick and easy!
Deg Celsius or farenheight?
Fahrenheit!
I live in Germany and thought you meant celcius ,needless to say it didnt turn out.I then did like one lady said and did it the old fashioned way,turned out good
Oh I’m so glad you tried it again and it was a success!
Hi,
I did this recipe last year, no problem at all. This year, did it again and I had issue with the chocolate melting. First I have a new oven, second, I forgot to buy baking chocolate, so I bought Whittakers. However, whilst the dark chocolate was perfectly melted, the white and milk were over baked. I did a second batch and I was very careful not to over bake the milk and white chocolate whilst the dark one was under cooked, so it was a matter of letting it in the oven for a few seconds, taking it out and so on. I am heading to the shops and I will buy proper baking chocolate this time. I know dark chocolate handles heat better than other chocolate. Anyone has got a recipe for over cooked chocolate? Saying that, I love that recipe. Thanks a lot.
Ah, yes. I used Celsius…
I made white chocolate chips melted in microwave added coconut oil topped with crushed candy canes. Chips work fine, just more stirring. Sorry can’t send picture.
Got the picture in my email! It looks so great; thank you for sharing!
Can I use Hersheys chocolate bars?
I personally never have so can’t weigh in – if you try them and they work please let me know!
LOVED this! We made it last year and have added it to the regular Christmas candy rotation. It’s the perfect blend of sweet and savory. And sooooo easy!!
I’m SO glad! It’s on regular rotation every holiday here too! 🙂
Hi! I used the large pound bars for Trader Joe’s! My problem is it is not hardening?
Hmm – did you try popping in the fridge/freezer?
saw a recipe like this on tiktok and it used reg ole chco bars as well she had it on those huge huge bakers sheets (like she used 10 choc bars it was insane) Anyways, even though I do own one of those huge sheets I used three bars, and a reg ole cookie sheet, 175 and swirled then added the bling
Wow, 10 bars!?!?