homemade reed diffusers are super easy, inexpensive and smell fantastic!

I’m obsessed with these homemade reed diffusers and so excited to share this easy DIY with you today!
i was a scented candle addict!
Any scented candle enthusiasts out there?
**raises hand**
Actually, I’m a “former” enthusiast but let me tell you, the obsession was real.

For years, you could pretty much count on seeing a fragrant candle burning in my kitchen when you came into my house. I love to make my home smell amazing and I turned to scented candles (and – the horror – those spray can air fresheners!) to get the job done.
Looking back, I truly don’t understand what the attraction was. The scent was never very strong, the really good ones were costly, and they usually wound up collecting dust after being burned about halfway through.
why anything with artificial fragrance is a huge red flag!
So a few years ago I switched to reed diffusers. I bought them from the same company that made many of the candles I enjoyed, and I’ll admit that I loved the look of the labels and bottles (any “sucker for packaging” enthusiasts out there?). This was long before I watched the documentary “Stink” (have you seen it? It is HORRIFYING), and felt even better about my choice after learning about the real and totally hidden dangers of any product that includes the word “fragrance” in its ingredient list.

But here’s the thing: those diffusers – while perhaps posing less danger than scented candles – really didn’t smell much stronger. I wondered if it was possible to make my own diy reed diffuser, and if I’d get the results I was looking for.
you can make your own essential oil reed diffuser!
Turns out, making your own reed diffuser is cheap, easy and completely customizable! Most diffusers cost about $25 (though they can go way up from there), and last a few months.
what materials do you need?

Using essential oils and a few simple materials, you can make your own inexpensive, unique and pretty reed diffusers – here’s what you need!
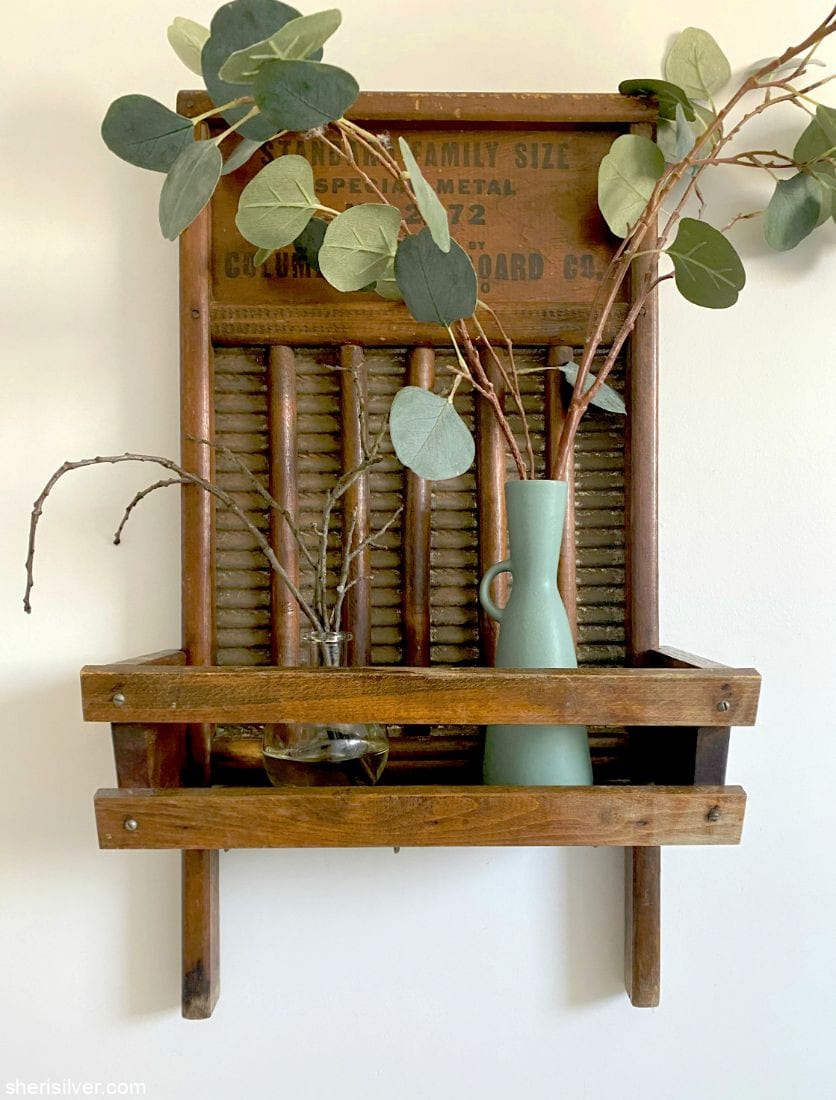
A bottle ($0 – $2). You can pick up inexpensive bottles at the craft store, or simply reuse any you have at home (Lemon essential oil removes sticker glue in a snap!). Choose a bottle with a narrow neck opening, which will slow the evaporation of the oil. You’ll be surprised at how many pretty bottles you probably have, once you start looking!
Reeds, twigs or bamboo skewers ($0 – $2). You can buy a pack of 100 reed sticks for under $10, which will make dozens of diffusers. Or do as I did and take a walk outside. Twigs are perfect for diffusing, look charming and are free!
Carrier oil (about $2 per 1/4 cup). You need to use a light, neutral oil to carry the fragrance up through the reeds and into the air. I like to use either fractionated coconut oil or sweet almond oil.
Essential oils (about $3 – $5 per diffuser). For every 2 ounces (1/4 cup) of oil in your diffuser you’ll need between 20 and 30 drops of your favorite essential oil blend. Too strong? Use less. Too weak? Add some more. Depending on your preferences, the size of the room and the strength of the oil, you’ll need to play around a bit till you get the amounts just right.
Total cost? Between $5 and $11.
I am thrilled with the way these turned out. They smell fantastic, look great and I love being able to easily switch up the scents. I’d love to know if you try this, and what oils you use!
SHOP THE POST!

Homemade Reed Diffuser
Equipment
Instructions
- Gather enough reeds or twigs to fill as much of the bottle opening as possible (this will reduce evaporation). If you are using bamboo skewers cut off the pointy ends. If you are using twigs bake them in a 200 degree oven for 45 minutes (this kills any little bugs that may be lurking). Trim the lengths if needed.
- Pour the carrier oil into the bottle, followed by the essential oils. Start with 20 drops (either of a single oil or combination) but feel free to add more (or use less) if you like. Insert the reeds and give the mixture a swirl. After a few hours, flip the reeds.
- Every few days or so, flip the reeds to disperse more of the fragrance. As the mixture evaporates, you can top it off with more oils.
- When the reeds become completely saturated simply toss and replace.
Notes
- I've read that bamboo skewers won't work - that you have to buy actual reeds. Personally I have found them to work just fine; if you have them lying around you can try them for yourself.
- Homemade reed diffusers make a lovely gift! Place the mixture in a sealed container and pack it up with the bottle and reeds (and instructions!).
- There are literally thousands of oil combinations you can use in your diffuser. And since everyone is different only you know what you'll like best. Since my diffusers are in public spaces like my kitchen and powder room, I stick with more universally appealing oils like lavender, citrus and eucalyptus.
- I have tried every "hack" under the sun to get those labels off my repurposed bottles - this is what works best for me: I stick the bottle - label up - under hot running water, and scratch it vigorously with a steak knife. If you are still left with a layer of adhesive, Lemon essential oil gets it off in a snap.
- A reader wrote in and suggested using a vegetable peeler to peel the outer bark from the twigs, to allow for greater absorption of the oil. I plan to do this next time!
Here are some more fun DIY’s to make for your home!

Please note that this post contains affiliate links. As a Rewards Style influencer I earn a small commission from qualifying purchases – at no additional cost to you!
29 Comments
Leave a Comment

Hi! I'm Sheri!
Welcome to my little corner of the web where you’ll find easy, delicious recipes, the best kitchen hacks and simple tips for turning your home into a clean haven that is free of toxins. So glad you’re here!

So good! And so pretty! Can’t wait to make!
Thank you so much! 🙂
Great idea!! (But try lemon oil to remove sticker residue instead of goo gone!)
I know! I know! I just hate to waste a drop of that oil! 🙂
You can use any oil! I use vegetable oil, it’s cheap, and always on hand.
Oh that’s great to know – I always have vegetable oil!! 🙂
Lemon essential oil removes left on label glue too 🙂 non-toxic!
Have not tried yet but can hardly wait! Love reed diffusers! Thank you
Yay! I do too! 🙂
I use a knife to scrape the label too, then rubbing alcohol gets the good off!!
Ah! Good to know about the alcohol! Thank you!
WD40 gets stubborn labels off, too.
Thank you! 🙂
Good information
Going to start making them for Christmas gifts and to sell
Yay! What a great idea and lovely gift! 🙂
To remove labels:. Using g hot water, peel what you easily can. Take a drop or so of oil such as olive and rub until the whole thing is covered. Let sit 3-24 hours. The oil dissolves the adhesive. Voila!!
Great suggestion!! Thank you! 🙂
I can’t wait to do this; going to collect some twigs today! So much cuter than store-bought ones. Thrift stores are a good source for bottles too. And isn’t Stink! a great documentary?! I told my kids (both parents of two girls each) to watch it as a gift for me for mother’s day, instead of buying me something. Thank you for the idea.
Stink was a game changer for me for sure. Happy happy Mother’s Day!
Can I use grape seed oil or witch hazel?
Yes you can swap the fractionated coconut oil for grape seed but witch hazel will not work – you can ADD witch hazel if you want but it won’t sub as a carrier oil! Hope this helps!
I’m new at this. I do have a question about twigs. Are you talking about any twig from a tree or shrub? And, does it need to be a skinned? More info on these twigs please.
Hi! Yes those are just twigs I gathered outside (most had fallen on the ground)! If you look at the notes I did mention that someone suggested using a vegetable peeler to get the outer bark off for better absorption. I have not tried this yet but let me know if you do! I hope this helps!!! 🙂
Awesome ideas
Thank you!
This homemade reed diffuser blog is such a great find!
I’ve been wanting to add a personal touch to my home’s ambiance, and making my own reed diffusers seems like the perfect idea. Your DIY guide is super helpful, and I love how you’ve explained everything step by step.
I’m thinking of experimenting with different essential oil blends. Have you come across any unique or favorite combinations you’d recommend?
Thank you! So glad you found this helpful! As for combinations it is SUCH a personal preference. I lean toward citrus oils (lemon, bergamot, tangerine) and the woodsy oils (spruce, pine, eucalyptus) so I will tend to combine those. I recommend opening up the bottles you’re thinking of combining and hold them together under your nose to see what they smell like together. And always start with less drops to begin with; you can always add more! 🙂
I have heard baby oil works? I ask because if it doesn’t smell like food maybe my cat wont try to eat it…
I’ve never tried baby oil! If you do and it works let me know and I’ll add it to the post! 🙂