I’m especially excited about my last guest post. Though it should really be titled, simply, “never”.
As in, “I never sew”.
Fortunately I knew just the person to share a fun, easy DIY with all of you who do. Caroline is truly one of the most lovely women I have met on this blogging journey. Caroline’s blog, Salsa Pie (great name, right?) is a daily dose of inspiring, “do-able” family-oriented projects and crafts. Even if I can’t execute a particular project (see above: I can’t sew), I always enjoy the great photos and Caroline’s warm, funny and upbeat writing. Salsa Pie is a true delight and this pillow DIY perfectly illustrates all that I love about this lady. Enjoy!
Hi, I’m Caroline Urdaneta. I’m a designer of creative family projects, a crafter, tinkering painter and mother of 4 children. I have a professional background in the art world and I started my blog Salsa Pie in 2009 to help foster an innovative spirit in my own children. I write about project ideas for the whole family and how to encourage creativity in children.
I really like monograms but my style is not at all formal, so when my daughter asked me to make her a pillow she could “snuggle” I immediately hatched a plan! I decided to sew an easy slipcover for a small, soft pillow with a fun, graphic initial on the front. The result? A snuggle-friendly pillow for her with a non-fussy monogram!
Even though I’m one of those crazy crafters, I’m really mostly attracted to projects that seem uncomplicated. I’ve seen lots of tutorials online for zipper-less slipcovers for pillows but today I am going to break it down for you in a very simple way and you can use this tutorial to cover a pillow of any size. To make a cover for any pillow in your home, you’ll simply need to cut out a square of fabric slightly larger than your pillow form. Measure another square then add this length to your 2nd square: approximately 3/4 the length of your first square. You cut the second larger square (which is actually a rectangle) in half. So, essentially you’ll be sewing together a square and two rectangles. Sound easy enough? If not, my steps here will lay this out for you.
To add a monogram, you can create your own stencil with freezer paper. You can print out a stenciled letter or if you want to create something a little more freestyle, you can draw the stencil by hand like I did.
What you will need:
A pillow form
Fabric
sewing machine (and thread to compliment fabric)
freezer paper
exacto knife
scissors
fabric paint (and small stencil sponge or brush)
Step 1:
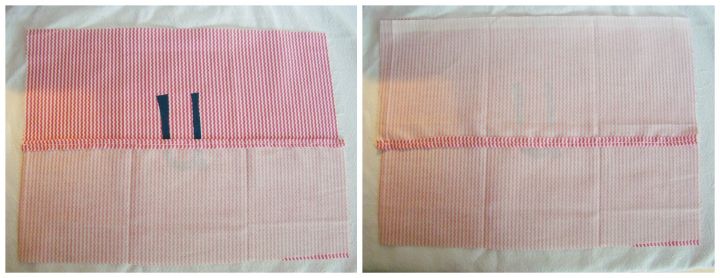
Measure your pillow form then measure a square of fabric slightly larger with enough allowance for the seams. Measure another square the same size as the first but on one side add another bit of length (about 3/4 the size of the square) so it will be a rectangle, larger than the first square. Next, cut the rectangle in half. You will now have a square of fabric and two rectangles. The rectangles will overlap on the backside of the cover to form an opening for your pillow.
Step 2:
If you would like to add a monogram to your pillow this would be the best time, before you sew the fabric squares together. You can make a simple stencil tracing a printed template online or you can draw your initial onto freezer paper then cut out your stencil using an exacto knife or sharp scissors. I decided to make my own stencil because I wanted to monogram to have a more graphic-homespun look.
To use a freezer paper stencil, set your iron to the “Dry” setting and iron the stencil onto your fabric with the waxy, shiny side down.
Step 3:
Once you iron your stencil on, use a stencil brush or sponge to dab fabric paint onto the stencil. *Tip: make sure to place a thick piece of paper behind the fabric while painting as the paint will bleed through. Once finished painting, remove the paper immediately so it doesn’t adhere to the fabric while drying.
Step 4:
Allow the fabric to dry (about 10-15 minutes) then get your sewing machine ready and choose your sewing thread. Your next step will be to hem the long edges of your two rectangles that will form the opening of your pillow cover. I made a very narrow hem to make sure I would have plenty of fabric to form the overlap for the opening.
Step 5:
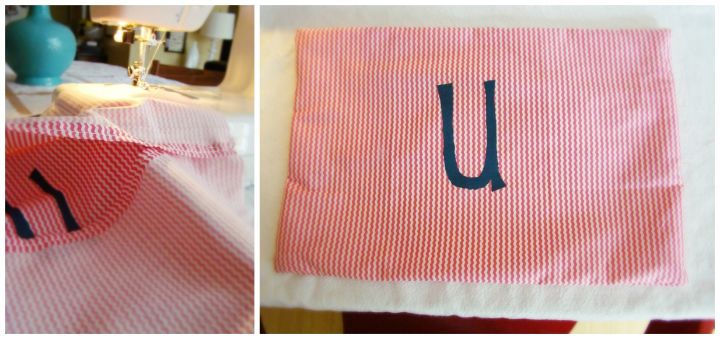
Lay the front stenciled piece of fabric with the backside facing down on your table. Lay one rectangle (with the hem at the top) on top of your front piece of fabric, at the bottom of your square, front sides facing one another. Repeat with the second rectangle except this time, your hem side will be at the bottom and this piece should overlap the first rectangle. Pin the sides together.
Step 6:
This part if so easy! Simply sew along the outer edge of the assembled cover then once you’ve sewn all along the edges, flip it right-side out!
Step 7:
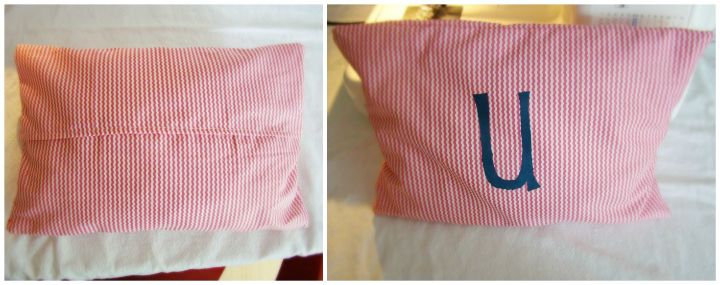
At this point, flip your cover over then insert your pillow form.
photo credit: Caroline Urdaneta
You’ll see that your flap overlaps in the back and your pillow is ready for some snuggling action! Enjoy!
2 Comments
Leave a Comment

Hi! I'm Sheri!
Welcome to my little corner of the web where you’ll find easy, delicious recipes, the best kitchen hacks and simple tips for turning your home into a clean haven that is free of toxins. So glad you’re here!


I love the pink zig zags of that fabric!
=)
I’m a big fan of Caroline and Salsa Pie – finding her here is like having two of my very favorite blogs combined in one! I took my first sewing class last year and haven’t touched the machine since. These pillow cases look so sweet and SO very doable too! I may just have to dust off that Singer…